The letterman jacket is a blank canvas of athletic achievement, personal milestones, and timeless style. Whether you just earned your varsity letters or you are customizing a retro piece for everyday streetwear, figuring out where to put patches on a letterman’s jacket can feel a bit overwhelming. You have a finite amount of real estate—wool body, leather sleeves, and knit ribs—and every placement tells a story.
If you mess up the layout, your jacket can look cluttered or unbalanced. But when you nail the placement? You get a piece of wearable art that looks authentically vintage and deeply personal. Let’s break down the traditional rules, modern streetwear aesthetics, and step-by-step strategies for mapping out your patches like a pro.
Anatomy of a Varsity Jacket: Mapping Your Real Estate
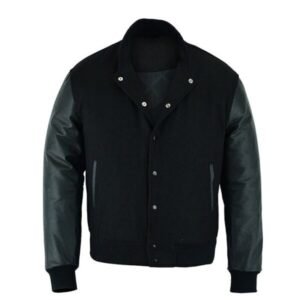
Before you even touch a needle, an iron, or a sewing machine, you need to understand the structural zones of a standard varsity jacket. Each area has a traditional purpose, though modern custom design has opened the door to plenty of creative freedom.
- Left Chest: This is the holy grail of varsity jacket real estate. Traditionally reserved for your primary varsity letter (chenille initial), it sits right over your heart.
- Right Chest: The counterpart to the left chest. This spot usually features a graduation year, player number, or a secondary club/sport emblem.
- Right and Left Sleeves: The leather or wool sleeves are long strips of opportunity. They are traditionally home to championship patches, position numbers, mascots, and milestone markers stacked vertically.
- Upper Back: The upper back shoulders are prime territory for large team names, school mottos, or bold mascot chenille appliqués arching across the back.
- Lower Back and Pocket Welts: Usually kept clean, though some custom jackets feature smaller memorial patches or graduation year markers right above the waistband or on the pocket trim.
The Left Chest: The Home of the Primary Letter
Let’s start with the most sacred rule of letterman jacket layout: the left chest belongs to the primary letter. If you have a big, bold chenille letter representing your school, sport, or organization, it goes on the left side, period.
Pro-Tips for Left Chest Placement:
- Center it properly: The center of the letter should align roughly with the midpoint between the central zipper/button line and the side seam of the chest panel.
- Leave breathing room: Don’t crowd the letter with too many tiny surrounding patches. Let the letter stand out as the hero of the front layout.
- Sport inserts: If your letter came with a small sport-specific emblem embedded in the center (like a basketball, crossed bats, or a track shoe), you are already set. If not, you can place a small sport pin or embroidered emblem just below or tucked beside the main letter.
Balancing the Right Chest
Once the left chest is locked down, your eyes naturally move to the right chest. This side needs to balance the visual weight of your main varsity letter without competing with it.
What typically goes on the right chest?
- Graduation Year: Usually displayed as four digits split across the chest (e.g., ‘2’ and ‘6’ on either side) or formatted horizontally in bold block lettering.
- Player Number: If you wore a specific jersey number (like 12 or 23), a small felt or embroidered number block looks exceptionally sharp here.
- Leadership Pins & Small Crests: Captain bars, club president insignia, or small achievement stars fit nicely above or beside the graduation year.
Keep the right chest clean and geometric. Aligning your right-chest patches horizontally with the top or middle of your left-chest letter creates a clean, intentional look.
Mastering Sleeve Layout: The Art of the Stack
Sleeves are where letterman jackets truly shine. Whether your jacket features genuine cowhide leather sleeves or matching melton wool, sleeve patches add texture and history.
Traditionally, sleeves are used for sequential achievements. For example, if you played varsity football for three years, you might earn three stripes or chevron patches on the left sleeve.
How to layout sleeve patches effectively:
- Vertical Stacking: Start about 4 to 6 inches below the shoulder seam and stack patches downwards toward the wrist cuff. Leave about half an inch to an inch of space between each patch so they don’t bunch up when the sleeve bends.
- The Bicep Zone: Large mascot patches, championship shields, or organizational logos usually live on the upper outer bicep area of either sleeve.
- Symmetry vs. Asymmetry: You can load up both sleeves, or keep one sleeve completely clean for a minimalist look while stacking the other sleeve with milestones. Keeping the right sleeve clean and loading the left sleeve is a very popular modern streetwear choice.
- The Upper Arch: This is the classic location for your school name, team name, or personal surname rendered in large, curved chenille lettering.
- Mascot Appliques: A giant bulldog, tiger, eagle, or skull can dominate the center back panel.
- Milestone Collages: Some modern custom jackets feature a collection of patches from different life events, cities lived in, or band tours clustered in the center back.
- Pop Culture & Abstract Patches: Swapping out traditional athletic sports for anime characters, vintage brand logos, music icons, and abstract symbols.
- Asymmetrical Overload: Crowding one side of the jacket with a dense cluster of patches while leaving the rest clean for an edgy, collage-style look.
- Monochrome Cleanliness: Sticking strictly to black-and-white or tonal patches for a sleek, minimalist designer appearance.
- Sewing (Recommended): Leather and heavy wool require a sturdy needle (like a leather needle size 100/16 or heavy-duty denim needle) and strong polyester or nylon thread. Hand-sewing using a whipstitch or blanket stitch gives a gorgeous traditional finish.
- Iron-On: Great for cotton or light wool blends, but be extremely careful with genuine leather sleeves—direct high heat from an iron can scorch or melt leather instantly. Always use a pressing cloth and test a hidden spot first.
- Fabric Glue / Velcro: Useful for temporary placement or backing, but sewing remains the only permanent solution for jackets that will experience heavy wear.
The Back Panel: Making a Statement
The back of a varsity jacket offers the largest flat surface area, making it ideal for bold statements. However, because the jacket folds and moves when you sit or walk, you want to be strategic about what goes back there.
If you prefer a clean, understated aesthetic, leave the back completely blank. A plain leather-sleeved back looks sophisticated and transitions effortlessly from high school nostalgia to high-end streetwear fashion.
Traditional Rules vs. Modern Streetwear Customization
Decades ago, letterman jackets followed strict high school and collegiate rulebooks. Every patch had to be earned, measured, and placed according to strict institutional guidelines.
Today? The rules have completely changed.
If you are building a custom jacket for personal style, fashion, or brand representation, you are the designer. Here is how modern streetwear enthusiasts break the traditional rules:
Step-by-Step Guide to Applying Your Patches
Once you decide where your patches are going, the actual application process requires patience and precision. Whether you are working with iron-on, sew-on, or velcro patches, here is how to do it right.
Step 1: Dry Fit and Pin
Never rush into stitching or ironing. Lay your jacket flat on a table, place your patches where you think they should go, and step back. Take photos from a few feet away to check the symmetry and visual balance. Use straight pins or sewing clips to lock them in place.
Step 2: Try It On
Put the jacket on. Look in the mirror and move your arms. Sometimes a patch that looks great flat on a table pulls weirdly when the leather or wool conforms to your shoulder or elbow.
Step 3: Choose Your Attachment Method
Ready to Design Your Own Custom Masterpiece?
Stop guessing how to arrange patches on an old, worn-out hand-me-down jacket. Build your dream varsity jacket from scratch with complete control over colorways, body materials, leather quality, and personalized chenille patch placement.
Whether you want a classic collegiate aesthetic or a bold, custom streetwear design, we have premium jackets waiting for your vision.
Design Your Custom Varsity Jacket Now
Frequently Asked Questions
Can I put iron-on patches on leather sleeves?
It is generally not recommended to use direct iron-on heat on genuine leather sleeves because high temperatures can permanently melt, warp, or discolor the leather. Instead, use fabric glue designed for leather or, even better, hand-stitch or machine-stitch your patches securely in place.
How do I make sure my patch placement is symmetrical?
Use a fabric measuring tape from central reference points, such as the center front zipper, the shoulder seam, or the collar base. Measure the exact distance to each patch on both the left and right sides. Taking a photo of your jacket laid flat with pins in place is also a great way to spot alignment issues before you make it permanent.
Should I sew patches on myself or take them to a tailor?
If the patches are going onto soft wool body panels, you can easily sew them at home with a heavy-duty needle and thread. However, if you are stitching thick chenille or heavy embroidered patches through multi-layer leather sleeves, taking your jacket to a professional tailor or leather specialist will save you broken needles and a major headache.
Can I remove a varsity patch if I change my mind later?
Removing stitched patches is possible using a seam ripper, but be careful. Heavy stitching on wool can leave tiny hole marks, and stitching on genuine leather will permanently leave needle puncture holes visible. Always double-check your layout before committing to permanent application!