How to Sew a Varsity Jacket: A Complete Step-by-Step Guide for Makers
There is something undeniably iconic about a classic varsity jacket. Also known as a letterman jacket, this timeless piece of outerwear carries decades of high school athletics, college pride, and street style heritage. Buying a pre-made jacket is easy enough, but creating your own from scratch takes the experience to an entirely different level. Whether you want to recreate a vintage aesthetic, support your favorite sports team with custom colors, or simply test your garment-construction skills, learning how to sew a varsity jacket is one of the most rewarding sewing projects you can tackle.
Make no mistake: tackling a jacket featuring wool bodies, genuine leather or faux leather sleeves, rib-knit trims, and quilted linings is an advanced sewing project. It requires patience, the right machinery, and meticulous attention to detail. However, if you break the process down step by step, you can build a professional-quality jacket that looks like it came straight out of a boutique.
If you love the look of a custom letterman jacket but realize the handmade route is a bit too intense for your current schedule, you can always skip the sewing machine and Order Custom Varsity Jacket options tailored precisely to your exact measurements, color scheme, and embroidery preferences.
For those ready to fire up the sewing machine, grab your rotary cutter, and dive in, here is the ultimate guide to sewing your very own varsity jacket.
Understanding the Anatomy of a Varsity Jacket
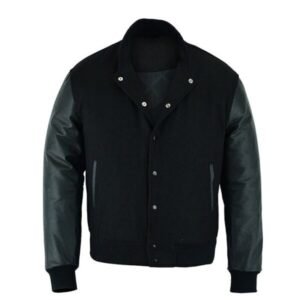
Before diving into the cutting table, it helps to understand what makes a varsity jacket unique. Unlike a standard hoodie or a lightweight windbreaker, a letterman jacket relies on structural contrast, specialized fabrics, and heavy-duty hardware.
- The Body: Traditionally crafted from heavy wool, melton wool, or heavy cotton fleece. It provides warmth and structure.
- The Sleeves: Historically made from cowhide or sheepskin leather, though modern makers often use high-grade vegan leather or heavy vinyl for easier sewing and maintenance.
- The Trims: Striped rib-knit bands used for the collar, cuffs, and waistband. These provide snugness and athletic styling.
- The Lining: A slippery inner layer—often quilted satin or polyester—that helps the jacket slide easily over sweaters and long-sleeve shirts.
- Closures: Metal snap buttons are the standard for varsity jackets, though some modern designs opt for heavy-duty metal zippers.
Materials and Tools You Will Need
Working with heavy fabrics means standard sewing supplies might not cut it. Gather these specialized tools and materials before you begin:
- Jacket Pattern: Look for a dedicated varsity or letterman jacket sewing pattern from a reputable independent designer or major pattern company.
- Outer Body Fabric: 1.5 to 2 yards of heavy wool, melton wool, or heavy fleece.
- Sleeve Fabric: 1 to 1.5 yards of genuine leather, faux leather, or heavy vinyl.
- Lining Fabric: 1.5 to 2 yards of satin, polyester lining, or pre-quilted lining fabric.
- Rib-Knit Trim: Matching striped ribbing for the collar, cuffs, and hem. Buy the continuous tubular kind or pre-cut strips designed specifically for varsity jackets.
- Interfacing: Medium-weight fusible interfacing to reinforce pocket openings and button/snap areas.
- Hardware: A set of metal jacket snaps and a snap-setting tool (or heavy-duty separating zipper, if preferred).
- Needles: Leather needles (size 90/14 or 100/16) for sewing leather sleeves, and universal or denim needles for the wool body.
- Notions: Heavy-duty polyester thread, wonder clips (pins will leave permanent holes in leather!), tracing paper, and basic sewing tools.
Step 1: Selecting and Adjusting Your Pattern
Start by selecting a pattern that matches your desired fit. Varsity jackets traditionally have a boxy, relaxed fit with dropped shoulders. If you prefer a modern, slim-fit silhouette, check the ease measurements on the pattern envelope and grade down if necessary.
Print or trace your pattern pieces. Make sure to check the length of the body and sleeves. Because of the thick rib-knit cuffs and waistbands, getting the torso and arm length right during the paper-fitting stage saves you from awkward adjustments later.
Step 2: Cutting Your Fabrics (Carefully!)
Cutting out a varsity jacket requires different techniques for different materials. Take your time here—fabric mistakes are costly.
- The Wool Body: Lay your wool flat on a large cutting table. Use pattern weights and a rotary cutter for crisp, accurate lines. Transfer all dart markings, pocket placements, and notch indicators using tailor’s chalk.
- The Leather Sleeves: Leather hides often have natural blemishes, scars, or uneven thicknesses. Inspect your hide before cutting. Lay your sleeve pattern pieces on the best parts of the hide, avoiding flawed areas. Never use pins on leather because the holes are permanent. Use pattern weights and binder clips to hold your pattern pieces in place while cutting with a sharp rotary cutter or specialized leather shears.
- The Lining: Cut your lining pieces using the main body and sleeve pattern pieces, remembering to omit any facing pieces if your pattern calls for them.
Step 3: Constructing Welt Pockets
Most classic varsity jackets feature double-welt pockets on the front panels. This is widely considered the most intimidating step of the process, but patience wins the day.
- Apply fusible interfacing to the wrong side of the jacket front where the pocket opening will sit. This stabilizes the fabric against stretching.
- Mark your pocket placement lines precisely with tailor’s chalk.
- Cut your welt strips, fold them, and sew them to the jacket front along the marked lines.
- Carefully slash the fabric between the stitching lines, cutting diagonally into the corners without snipping your stitches.
- Push the welt pieces through to the wrong side of the jacket, press them flat, and secure the pocket bag pieces on the inside. Topstitch around the pocket opening for a clean, professional finish.
Step 4: Assembling the Wool Body
With your pockets finished, you can begin putting the main shell together.
- Sew the shoulder seams of the front and back wool body panels together, right sides facing. Press the seams open.
- If your jacket requires traditional chenille patches, embroidery, or custom applique letters on the chest or back, now is the absolute best time to sew or iron them on. Trying to apply patches after the jacket is fully assembled is a nightmare for sewing machine clearance.
Step 5: Preparing and Attaching the Sleeves
Attaching leather sleeves to a wool body is where your machine setup matters most.
- Sew the underarm seams of your leather sleeves. Use a leather needle and lengthen your stitch length slightly (about 3 to 3.5mm). Short stitches perforate leather like a postage stamp and cause it to tear under tension.
- Use wonder clips to attach the sleeve head to the armscye of the wool body, matching notches carefully.
- Slowly stitch the sleeves in place. If your machine struggles to feed the leather against the wool, use a walking foot or place a strip of tissue paper or painter’s tape along the seam line to help the materials glide smoothly.
Step 6: Assembling the Lining
While the outer shell is taking shape, construct the lining separately.
- Sew the shoulder seams and side seams of your lining pieces just like you did with the outer shell.
- Sew the lining sleeves together, and attach them to the lining armscyes.
- Crucial Step: Leave an opening of about 6 to 8 inches open along one of the sleeve seams in the lining. You will use this gap later to turn the entire jacket right-side out!
Step 7: Adding Rib-Knit Trims
The striped ribbing gives the varsity jacket its sporty signature look.
- Measure your collar, cuffs, and bottom waistband against the pattern specifications. Ribbing needs to be slightly shorter than the garment edge it attaches to so it hugs the body snugly.
- Fold the ribbing strips in half lengthwise with wrong sides together and press gently.
- Pin or clip the raw edges of the ribbing to the cuffs and bottom hem of the jacket shell, stretching the ribbing slightly as you sew to fit the wider jacket edges evenly.
Step 8: Joining Shell and Lining, Installing Snaps
You are in the home stretch!
- With the jacket shell right side out and the lining inside out (meaning their right sides are facing each other), sandwich the neckline ribbing between the shell and the lining.
- Stitch all the way around the collar and down the front opening edges.
- Reach through the opening you left in the lining sleeve and gently pull the entire jacket right side out. Push the corners out neatly and press the edges.
- Close the opening in the lining sleeve by hand with a ladder stitch or machine stitch it closed right on the edge.
- Install your metal snap buttons along the front placket using a hammer, anvil, and snap-setting tool, following the manufacturer’s instructions. Space them evenly for a balanced, clean closure.
Love the Varsity Style, But Short on Time?
Sewing a custom leather-sleeve varsity jacket is an incredible test of craftsmanship, but it demands hours of precise cutting, specialized needlework, and advanced construction techniques. If you want a flawless, professional letterman jacket without the headache of DIY sewing, we have you covered.
Explore our premium collection of customizable outerwear where you can choose your exact body fabrics, leather sleeve colors, custom embroidery, and personalized lettering. Built for durability, comfort, and unmatched style.
Frequently Asked Questions
Can I sew a varsity jacket on a standard home sewing machine?
Yes, but with caveats. While a standard domestic machine can easily handle wool and lining fabrics, sewing genuine leather sleeves requires adjustments. You will need a heavy-duty leather needle (size 90/14 or 100/16), heavy-duty polyester thread, and potentially a walking foot to prevent the leather from sticking to the presser foot. If your machine struggles with thick layers, consider using faux leather or vinyl, which is much softer and easier to stitch on standard machines.
How do I prevent leather from puckering or sticking while sewing?
Leather does not stretch or slide the same way woven fabrics do, which often leads to uneven feeding. To solve this, avoid using pins, as they leave permanent holes. Instead, use wonder clips or sewing binding clips. If your machine drags on the leather surface, apply a light layer of leather conditioner, use a Teflon or roller foot, or place a layer of tissue paper between the leather and the presser foot (you can simply tear the paper away after stitching).
What is the hardest part of making a varsity jacket?
Most makers agree that sewing welt pockets and managing the bulk at the collar and placket junctions are the most challenging steps. Because you are combining heavy wool, thick leather, ribbing, and slick lining all in one seam, bulk management requires careful pressing, trimming seam allowances down, and sometimes hand-basting layers together before taking them to the sewing machine.
How long does it take to sew a varsity jacket from scratch?
For an experienced sewist comfortable with outerwear and leather, construction typically takes between 8 to 15 hours spread across a few days. If you are an intermediate maker tackling welt pockets and leather sleeves for the first time, give yourself a full weekend and take plenty of breaks to ensure crisp, clean results.